
Rejection Proof Design Patent Illustration — 12 Ways to Ensure
Fortifying Your Design: 12 Proven Strategies for Rejection-Proof Patent Illustrations
Creating design patent illustrations that are resistant to rejection requires a careful approach to detail and accuracy. Here are twelve ways to ensure your design patent illustrations are rejection-proof:
- Utilize 3D Models When Possible: Ask the inventor if they can provide a 3D model of the invention. Utilizing a 3D model ensures superior quality, accuracy, and consistency in the drawings.
- Consider Creating a 3D Model: If a 3D model of the invention is not available, but the design is simple enough for the draftsperson to create one, it’s worth considering. Even with the additional step of making a 3D model first, it is often still a much better way to go than using the error-prone manual image tracing method.
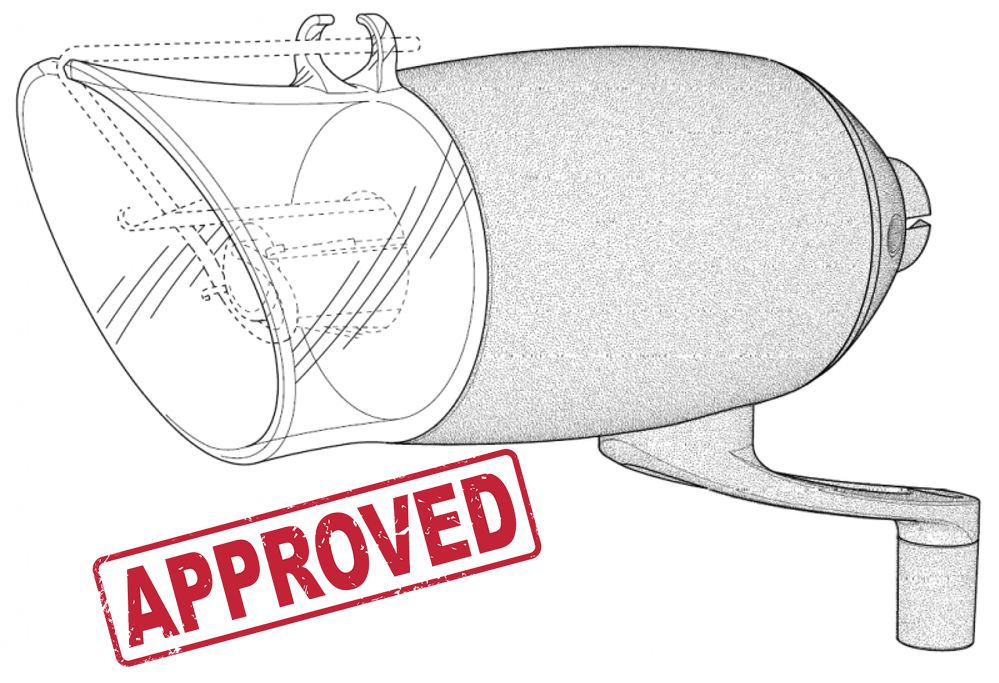
- Plan Details and Views Upfront: Decide upfront what will go in dashed lines, what details will be omitted, simplified, or modified (if any), and what views will be omitted or included. The goal is to do things right the first time around, which is the best way for design patents.
- Opt for Automatic Stipple Shading: If possible, go with an automatic stipple shading technique rather than error-prone manual line shading techniques. Stippling ensures better differentiation between claimed (stippled) and not claimed (not stippled) areas of the design. It also avoids problems with symbolism and tangent lines in design drawings.
- Avoid Tangent Lines: These lines were commonly used until now but should be avoided because it has been proven in court that they may be interpreted as part of the claimed design feature and not as shading lines.
- Ensure Accuracy in Line Types: Avoid manual conversion of solid lines to dashed lines. Opt for obtaining accurate line types (solid vs dashed) directly from the 3D model – guaranteed accuracy and consistency across views.
- Avoid Hard-to-Reach Areas: Avoid claiming hard-to-reach areas (such as areas inside recessions, openings, holes, etc.) with solid lines. If necessary, ensure you have sufficient views to fully disclose each surface located in hard-to-reach areas. Consider using sectional views to reveal the characteristics of these surfaces. If possible, it’s best to disclaim all hard-to-reach areas with broken lines to avoid ambiguity.
- Remove Very Small Parts: Avoid very small parts/elements in your design. If possible, remove and completely omit very small parts/elements, as they may appear solid even when represented with dashed lines. Otherwise, consider using zoomed views to fully disclose their details.
- Omit Unnecessary Elements: Avoid unnecessary parts/elements in your design. If many unnecessary elements are shown in solid lines, you would need to ensure they are fully disclosed, which may require numerous views. The best approach is to omit/remove them if possible. The second-best option is to disclaim them with broken lines to simplify the disclosure process.
- Disclose Complex Surfaces Properly: If you have complex surfaces in your design (organically shaped, convex, concave, etc.), ensure you properly disclose complex surfaces with appropriate shading and sufficient views, including sectional views if necessary, to clearly depict their characteristics.
- Hire Competent Patent Drafter: Ensure that your patent drafter is competent and experienced in creating design patent illustrations. A skilled drafter can help you navigate the complexities of design patent illustration and ensure that your drawings are rejection-proof.
- Proper Quality Control: Implement proper quality control measures, including drawing inspection and review, to ensure that the final illustrations meet the necessary standards and requirements. Regular checks and reviews can help identify and rectify any issues before submission.
By following these guidelines, you can create design patent illustrations that are accurate, clear, and more likely to withstand the scrutiny of the patent examination process.
Recommended Webinars
Delve deeper into the topics discussed in this article by attending our webinars. These sessions provide further insights and offer the chance to interact with experts in design patent drafting and illustration.
- Design Webinars: Avoiding Non-Correctable Errors in Design Patents:: Discover how to avoid non-correctable errors in design patents and ensure the success of your applications in this informative webinar by IP DaVinci.
- Design Webinars: Handling Advanced Scenarios in Design Patents: Explore strategies for handling advanced scenarios in design patents in this insightful webinar by IP DaVinci, enhancing your ability to navigate complex cases.
- Design Webinars: Cost and Time Saving Tips for Design Patent Drawings: Learn cost and time-saving tips for design patent drawings in this practical webinar by IP DaVinci, aimed at streamlining your patent application process.
Provide Feedback
We value your feedback! Let us know how we can improve or what topics you’d like to see next.
Connect with Mike
Have questions or need support? Connect with Mike for personalized assistance.
Share Your Experience
Found our series helpful? Share it with your network and help others benefit too!